The following tutorials walk you through the steps to build your own weather station and connect it the AskSensors IoT platform. Make sure that you have already created your AskSensors account and read this getting started guide.
Disclaimer : In these cases, DHT11/DHT22 sensors are used only for testing purpose. Please refer to this comparative article to choose the sensor that fits your needs.
1-Weather stations using ESP8266 and DHT
This part will cover how to use a DHT sensor and ESP8266 WiFi module with the AskSensors IoT platform to allow reading the sensor temperature and humidity from the Internet.

a) Hardware requirements :
- ESP8266 nodeMCU, but feel free to use different ESP8266 compatible modules.
- DHT11 sensor, The DHT22 is also an alternative.
- USB Micro cable to connect the nodeMCU to your computer.
- Wires for connections between the DHT11 and the nodeMCU
The connections between the DHT and the node MCU are:
- The Power supply pin of DHT11 to 3V of the node MCU.
- The Data pin to GPIO2 (D4).
- The ground to the ground.
b) DHT Sensor Specifications :
The following application was tested with a DHT11 module. here are the main specifications:
- Operating Voltage: 3.5V to 5.5V
- Operating current: 0.3mA (measuring) 60uA (standby)
- Output: Serial data
- Temperature Range: 0°C to 50°C
- Humidity Range: 20% to 90%
- Resolution: Temperature and Humidity both are 16-bit
- Accuracy: ±2°C and ±5%
c) Install ESP8266 in Arduino IDE :
- Install the latest version of Arduino IDE software (1.8.7 or higher) from the official Arduino download page
- Open the preferences window from the Arduino IDE : File> Preferences.
- Go to the “Additional Board Manager URLs” field, Enter the following URL:
http://arduino.esp8266.com/stable/package_esp8266com_index.json - Open boards manager (Tools > Board > Boards Manager), search for ESP8266 and click the install button for the “ESP8266 by Espressif Systems”. It takes some few seconds.
d) Software :
- Install the Adafruit DHT Library.
- Get this example sketch from the AskSensors Github page.
- Modify the Wi-Fi SSID and password, the Api Key In:
const char* wifi_ssid = ".........."; // SSID
const char* wifi_password = ".........."; // WIFI
const char* apiKeyIn = ".........."; // API KEY IN
e) Run the code :
Now, let’s connect your board to the cloud.
- Connect the ESP8266 nodeMCU to your computer through a USB cable.
- Open Arduino IDE and upload the code.
- Open a serial terminal. You should see your ESP8266 connecting to internet through WiFi.
- The ESP8266 will periodically reads the temperature and the humidity and send it to the askSensors. You can cross-check the AskSensors graph readings with the values being printed on your Arduino Terminal.
f) Source Code :
A basic source code is shown below. Please refer to the AskSensors Github page to get the latest version and updates.
/*
* DHT Temperature and humidity monitoring using ESP8266 and the askSensors
* Description: This examples connects the ESP to wifi, and sends Temperature and humidity to askSensors IoT platform over HTTPS GET Request.
* Author: https://asksensors.com, 2018
* github: https://github.com/asksensors
*/
// includes
#include <ESP8266WiFi.h>
#include <WiFiClientSecure.h>
#include <Adafruit_Sensor.h>
#include <DHT.h>
#include <DHT_U.h>
// user config: TODO
const char* wifi_ssid = ".........."; // SSID
const char* wifi_password = "........."; // WIFI
const char* apiKeyIn = "........."; // API KEY IN
// ASKSENSORS config.
const char* https_host = "api.asksensors.com"; // ASKSENSORS host name
const int https_port = 443; // https port
const char* https_fingerprint = "B5 C3 1B 2C 0D 5D 9B E5 D6 7C B6 EF 50 3A AD 3F 9F 1E 44 75"; // ASKSENSORS HTTPS SHA1 certificate
// DHT config.
#define DHTPIN 2 // Pin which is connected to the DHT sensor.
// Uncomment the type of sensor in use:
#define DHTTYPE DHT11 // DHT 11
//#define DHTTYPE DHT22 // DHT 22 (AM2302)
//#define DHTTYPE DHT21 // DHT 21 (AM2301)
DHT_Unified dht(DHTPIN, DHTTYPE);
uint32_t delayMS;
int status = WL_IDLE_STATUS;
float myTemperature = 0, myHumidity = 0;
// create ASKSENSORS client
WiFiClientSecure client;
//
void setup() {
Serial.begin(115200);
Serial.println();
Serial.print("********** connecting to WIFI : ");
Serial.println(wifi_ssid);
WiFi.begin(wifi_ssid, wifi_password);
while (WiFi.status() != WL_CONNECTED) {
delay(500);
Serial.print(".");
}
Serial.println("");
Serial.println("-> WiFi connected");
Serial.println("-> IP address: ");
Serial.println(WiFi.localIP());
// Initialize device.
dht.begin();
Serial.println("DHTxx Unified Sensor Example");
// Print temperature sensor details.
sensor_t sensor;
dht.temperature().getSensor(&sensor);
Serial.println("------------------------------------");
Serial.println("Temperature");
Serial.print ("Sensor: "); Serial.println(sensor.name);
Serial.print ("Driver Ver: "); Serial.println(sensor.version);
Serial.print ("Unique ID: "); Serial.println(sensor.sensor_id);
Serial.print ("Max Value: "); Serial.print(sensor.max_value); Serial.println(" *C");
Serial.print ("Min Value: "); Serial.print(sensor.min_value); Serial.println(" *C");
Serial.print ("Resolution: "); Serial.print(sensor.resolution); Serial.println(" *C");
Serial.println("------------------------------------");
// Print humidity sensor details.
dht.humidity().getSensor(&sensor);
Serial.println("------------------------------------");
Serial.println("Humidity");
Serial.print ("Sensor: "); Serial.println(sensor.name);
Serial.print ("Driver Ver: "); Serial.println(sensor.version);
Serial.print ("Unique ID: "); Serial.println(sensor.sensor_id);
Serial.print ("Max Value: "); Serial.print(sensor.max_value); Serial.println("%");
Serial.print ("Min Value: "); Serial.print(sensor.min_value); Serial.println("%");
Serial.print ("Resolution: "); Serial.print(sensor.resolution); Serial.println("%");
Serial.println("------------------------------------");
// Set delay between sensor readings based on sensor details.
delayMS = sensor.min_delay / 1000;
}
void loop() {
// Read data from DHT
// Delay between measurements.
delay(delayMS);
// Get temperature event and print its value.
sensors_event_t event;
dht.temperature().getEvent(&event);
if (isnan(event.temperature)) {
Serial.println("Error reading temperature!");
}
else {
// Update temperature and humidity
myTemperature = (float)event.temperature;
Serial.print("Temperature: ");
Serial.print(myTemperature);
Serial.println(" C");
}
// Get humidity event and print its value.
dht.humidity().getEvent(&event);
if (isnan(event.relative_humidity)) {
Serial.println("Error reading humidity!");
}
else {
myHumidity = (float)event.relative_humidity;
Serial.print("Humidity: ");
Serial.print(myHumidity);
Serial.println("%");
}
// Use WiFiClientSecure class to create TLS connection
Serial.print("********** connecting to HOST : ");
Serial.println(https_host);
if (!client.connect(https_host, https_port)) {
Serial.println("-> connection failed");
return;
}
/* ignore certificate verification
if (client.verify(https_fingerprint, https_host)) {
Serial.println("-> certificate matches");
} else {
Serial.println("-> certificate doesn't match");
}
*/
// Create a URL for the request
String url = "/write/";
url += apiKeyIn;
url += "?module1=";
url += myTemperature;
url += "&module2=";
url += myHumidity;
Serial.print("********** requesting URL: ");
Serial.println(url);
client.print(String("GET ") + url + " HTTP/1.1\r\n" +
"Host: " + https_host + "\r\n" +
"Connection: close\r\n\r\n");
Serial.println("> Request sent to ASKSENSORS");
while (client.connected()) {
String line = client.readStringUntil('\n');
if (line == "\r") {
String line = client.readStringUntil('\n');
Serial.println("********** ASKSENSORS replay:");
Serial.println(line);
Serial.println("********** closing connection");
break;
}
}
delay(25000); // delay in msec
}
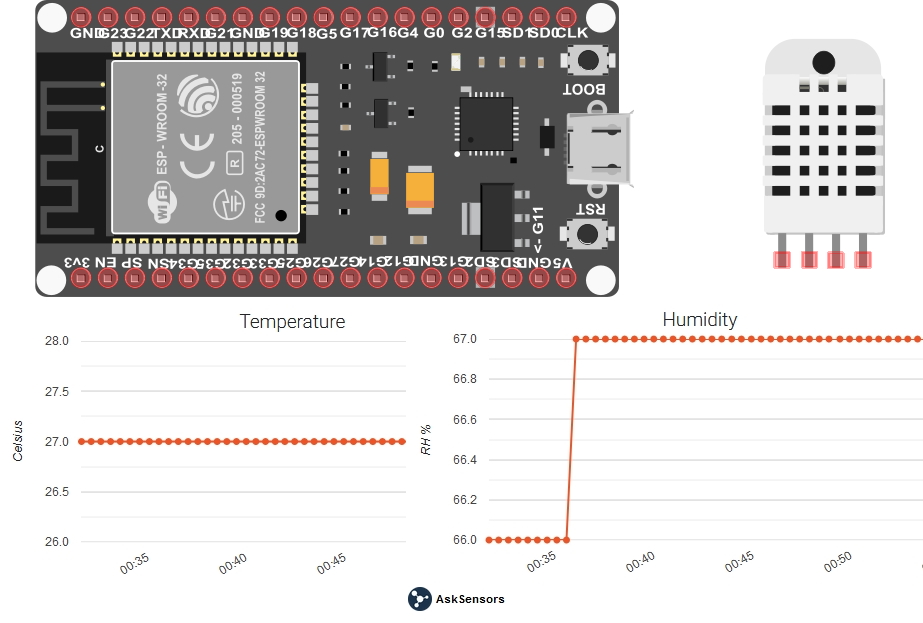
2- Weather stations using ESP32 and DHT
This section explains how to monitor the temperature and humidity of your room or desk using the DHT22 and the ESP32 connected to the cloud.
a) Hardware requirements :
- ESP32 WiFi module
- DHT22 sensor, The DHT11 is also an alternative.
- 47K Resistor
- Wires for connections between the DHT22 and the ESP32
- USB Micro cable to connect the ESP32 to your computer.
The connections between the DHT and the ESP32 are:
- DHT VCC to ESP32 5V.
- DHT Ground to ESP32 Ground.
- DHT Data to ESP32 IO4 (specified in the code).
- Connect the Data (IO4) pin and the 5V with a 47K or 10K pull up resistors.
b) DHT Sensor Specifications:
The following application was tested with a DHT22 module. here are the main specifications:
- Operating Voltage: 3.5V to 5.5V
- Operating current: 0.3mA (measuring) 60uA (standby)
- Output: Serial data
- Temperature Range: 0°C to 50°C
- Humidity Range: 20% to 90%
- Resolution: Temperature and Humidity both are 16-bit
- Accuracy: ±2°C and ±5%
c) Install ESP32 in Arduino IDE :
- Follow the instructions below to install the ESP32 board in your Arduino IDE:
- Install the latest version of Arduino IDE software (1.8.7 or higher).
- Open the preferences window from the Arduino IDE : File> Preferences.
- Go to the “Additional Board Manager URLs” field, Enter the following URL:
<b>https://dl.espressif.com/dl/package_esp32_index.json</b>
If you already have the ESP8266 boards URL, separate the URLs with a comma as show below:
<b>https://dl.espressif.com/dl/package_esp32_index.json, </b><b>http://arduino.esp8266.com/stable/package_esp8266com_index.json</b>
Now, open boards manager (Tools > Board > Boards Manager), search for ESP32 and click the install button for the “ESP32 by Espressif Systems”.
d) Software :
- Install the Adafruit DHT Library.
- Get this example sketch from the AskSensors Github page.
- Modify the Wi-Fi SSID and password, the Api Key In:
const char* wifi_ssid = ".........."; // SSID
const char* wifi_password = ".........."; // WIFI
const char* apiKeyIn = ".........."; // API KEY IN
e) Run the code :
Now, let’s connect your ESP32 weather station to the cloud.
- Connect the ESP32 to your computer through a USB cable.
- Open Arduino IDE and upload the code.
- Open a serial terminal. You should see your ESP32 connecting to internet through WiFi, Then, the ESP32 will periodically reads the temperature and the humidity and send it to AskSensors.
f) Source Code :
A basic source code is shown below. Please refer to the AskSensors Github page to get the latest version and updates.
/*
* DHT Temperature and humidity monitoring using ESP32 and askSensors Iot service
* Description: This examples connects the ESP32 to wifi, and sends Temperature and humidity to askSensors IoT platfom over HTTP GET Request.
* Author: https://asksensors.com, 2018
* github: https://github.com/asksensors
*/
// includes
#include <WiFi.h>
#include <WiFiMulti.h>
#include <HTTPClient.h>
#include <Adafruit_Sensor.h>
#include <DHT.h>
#include <DHT_U.h>
WiFiMulti WiFiMulti;
HTTPClient ask;
// user config: TODO
const char* ssid = "........"; // SSID
const char* password = ".........."; // WIFI
const char* apiKeyIn = ".............."; // API KEY IN
// ASKSENSORS config.
const char* host = "api.asksensors.com"; // host
const int httpPort = 80; // port
// DHT config.
#define DHTPIN 4 // Pin which is connected to the DHT sensor.
// Uncomment the type of sensor in use:
//#define DHTTYPE DHT11 // DHT 11
#define DHTTYPE DHT22 // DHT 22 (AM2302)
//#define DHTTYPE DHT21 // DHT 21 (AM2301)
DHT_Unified dht(DHTPIN, DHTTYPE);
uint32_t delayMS;
int status = WL_IDLE_STATUS;
float myTemperature = 0, myHumidity = 0;
// create ASKSENSORS client
//
void setup() {
// open serial
Serial.begin(115200);
Serial.println("*****************************************************");
Serial.println("********** Program Start : Connect ESP32 and DHT to AskSensors.");
Serial.println("Wait for WiFi... ");
// connecting to the WiFi network
WiFiMulti.addAP(ssid, password);
while (WiFiMulti.run() != WL_CONNECTED) {
Serial.print(".");
delay(500);
}
// connected
Serial.println("WiFi connected");
Serial.println("IP address: ");
Serial.println(WiFi.localIP());
// Initialize device.
dht.begin();
Serial.println("DHTxx Unified Sensor Example");
// Print temperature sensor details.
sensor_t sensor;
dht.temperature().getSensor(&sensor);
Serial.println("------------------------------------");
Serial.println("Temperature");
Serial.print ("Sensor: "); Serial.println(sensor.name);
Serial.print ("Driver Ver: "); Serial.println(sensor.version);
Serial.print ("Unique ID: "); Serial.println(sensor.sensor_id);
Serial.print ("Max Value: "); Serial.print(sensor.max_value); Serial.println(" *C");
Serial.print ("Min Value: "); Serial.print(sensor.min_value); Serial.println(" *C");
Serial.print ("Resolution: "); Serial.print(sensor.resolution); Serial.println(" *C");
Serial.println("------------------------------------");
// Print humidity sensor details.
dht.humidity().getSensor(&sensor);
Serial.println("------------------------------------");
Serial.println("Humidity");
Serial.print ("Sensor: "); Serial.println(sensor.name);
Serial.print ("Driver Ver: "); Serial.println(sensor.version);
Serial.print ("Unique ID: "); Serial.println(sensor.sensor_id);
Serial.print ("Max Value: "); Serial.print(sensor.max_value); Serial.println("%");
Serial.print ("Min Value: "); Serial.print(sensor.min_value); Serial.println("%");
Serial.print ("Resolution: "); Serial.print(sensor.resolution); Serial.println("%");
Serial.println("------------------------------------");
// Set delay between sensor readings based on sensor details.
delayMS = sensor.min_delay / 1000;
}
void loop() {
Serial.println("*****************************************************");
Serial.println("********** Start ");
// Read data from DHT
// Delay between measurements.
delay(delayMS);
// Get temperature event and print its value.
sensors_event_t event;
dht.temperature().getEvent(&event);
if (isnan(event.temperature)) {
Serial.println("Error reading temperature!");
}
else {
// Update temperature and humidity
myTemperature = (float)event.temperature;
Serial.print("Temperature: ");
Serial.print(myTemperature);
Serial.println(" C");
}
// Get humidity event and print its value.
dht.humidity().getEvent(&event);
if (isnan(event.relative_humidity)) {
Serial.println("Error reading humidity!");
}
else {
myHumidity = (float)event.relative_humidity;
Serial.print("Humidity: ");
Serial.print(myHumidity);
Serial.println("%");
}
// Use WiFiClient class to create TCP connections
WiFiClient client;
if (!client.connect(host, httpPort)) {
Serial.println("connection failed");
return;
}else {
// Create a URL for the request
String url = "https://api.asksensors.com/write/";
url += apiKeyIn;
url += "?module1=";
url += myTemperature;
url += "&module2=";
url += myHumidity;
Serial.print("********** requesting URL: ");
Serial.println(url);
ask.begin(url); //Specify the URL
//Check for the returning code
int httpCode = ask.GET();
if (httpCode > 0) {
String payload = ask.getString();
Serial.println(httpCode);
Serial.println(payload);
} else {
Serial.println("Error on HTTP request");
}
ask.end(); //End
Serial.println("********** End ");
Serial.println("*****************************************************");
}
client.stop(); // stop client
delay(20000); // delay
}
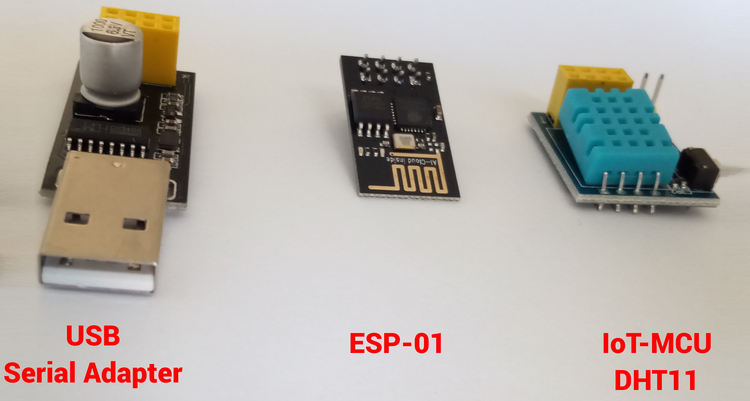
3- Low Cost Weather stations using IoT MCU ESP-01S
This part shows how to monitor the temperature and the humidity measurements using the IOT-MCU/ESP-01-DHT11 board and the AskSensors IoT Platform. The IOT-MCU ESP-01-DHT11 module is ready-to-use and save development time.
a) Hardware requirements :
- ESP-01 or ESP-01S.
- USB Serial converter to program your ESP-01.
- IOT-MCU/ ESP-01-DHT11.
- External 3.7V to 5V DC Power supply.
b) DHT Sensor Specifications :
The following application was tested with a DHT11 module. here are the main specifications:
- Operating Voltage: 3.5V to 5.5V
- Operating current: 0.3mA (measuring) 60uA (standby)
- Output: Serial data
- Temperature Range: 0°C to 50°C
- Humidity Range: 20% to 90%
- Resolution: Temperature and Humidity both are 16-bit
- Accuracy: ±2°C and ±5%
c) Install ESP8266 in Arduino IDE :
- Install the latest version of Arduino IDE software (1.8.7 or higher) from the official Arduino download page
- Open the preferences window from the Arduino IDE : File> Preferences.
- Go to the “Additional Board Manager URLs” field, Enter the following URL:
http://arduino.esp8266.com/stable/package_esp8266com_index.json - Open boards manager (Tools > Board > Boards Manager), search for ESP8266 and click the install button for the “ESP8266 by Espressif Systems”. It takes some few seconds.
d) Software :
- Install the Adafruit DHT Library.
- Get this example sketch from the AskSensors Github page.
- Modify the Wi-Fi SSID and password, the Api Key In:
const char* wifi_ssid = ".........."; // SSID
const char* wifi_password = ".........."; // WIFI
const char* apiKeyIn = ".........."; // API KEY IN
e) Run the code :
Now, let’s connect your board to the cloud.
- Install the USB serial adapter driver.
- Connect the GPIO_0 to the ground in order to enable the programming mode of ESP8266. There are some USB serial adapter that come with programming switch on it so during upload you have to press the switch. in my case,I have no switch, so I soldered a jumper between the GPIO_0 and the ground of the USB serial adapter.
- Insert the ESP-01 into the USB serial adapter
- Connect the serial adapter to your computer USB port.
- Open Arduino IDE. You should get ‘Port’ enabled. if not, select the right port shown for your USB serial adapter (On Arduino software click Tools >> Port).
- Select ‘Generic ESP8266 Module’ as your board (Go to Tools >> Board >> Generic ESP8266 Module )
- Hit the upload button, wait until the upload is complete.
f) Source Code :
A basic source code is shown below. Please refer to the AskSensors Github page to get the latest version and updates.
/*
* Low Cost Weather stations using IoT MCU ESP-01S
* Description: This examples monitors the temperature and the humidity measurements using the IOT-MCU/ESP-01-DHT11 board and the AskSensors IoT Platform.
* Author: https://asksensors.com, 2018
* github: https://github.com/asksensors
*/
// includes
#include <ESP8266WiFi.h>
#include <WiFiClientSecure.h>
#include <Adafruit_Sensor.h>
#include <DHT.h>
#include <DHT_U.h>
// user config: TODO
const char* wifi_ssid = ".........."; // SSID
const char* wifi_password = "........."; // WIFI
const char* apiKeyIn = "........."; // API KEY IN
// ASKSENSORS config.
const char* https_host = "api.asksensors.com"; // ASKSENSORS host name
const int https_port = 443; // https port
const char* https_fingerprint = "B5 C3 1B 2C 0D 5D 9B E5 D6 7C B6 EF 50 3A AD 3F 9F 1E 44 75"; // ASKSENSORS HTTPS SHA1 certificate
// DHT config.
#define DHTPIN 2 // Pin which is connected to the DHT sensor.
// Uncomment the type of sensor in use:
#define DHTTYPE DHT11 // DHT 11
//#define DHTTYPE DHT22 // DHT 22 (AM2302)
//#define DHTTYPE DHT21 // DHT 21 (AM2301)
DHT_Unified dht(DHTPIN, DHTTYPE);
uint32_t delayMS;
int status = WL_IDLE_STATUS;
float myTemperature = 0, myHumidity = 0;
// create ASKSENSORS client
WiFiClientSecure client;
//
void setup() {
Serial.begin(115200);
Serial.println();
Serial.print("********** connecting to WIFI : ");
Serial.println(wifi_ssid);
WiFi.begin(wifi_ssid, wifi_password);
while (WiFi.status() != WL_CONNECTED) {
delay(500);
Serial.print(".");
}
Serial.println("");
Serial.println("-> WiFi connected");
Serial.println("-> IP address: ");
Serial.println(WiFi.localIP());
// Initialize device.
dht.begin();
Serial.println("DHTxx Unified Sensor Example");
// Print temperature sensor details.
sensor_t sensor;
dht.temperature().getSensor(&sensor);
Serial.println("------------------------------------");
Serial.println("Temperature");
Serial.print ("Sensor: "); Serial.println(sensor.name);
Serial.print ("Driver Ver: "); Serial.println(sensor.version);
Serial.print ("Unique ID: "); Serial.println(sensor.sensor_id);
Serial.print ("Max Value: "); Serial.print(sensor.max_value); Serial.println(" *C");
Serial.print ("Min Value: "); Serial.print(sensor.min_value); Serial.println(" *C");
Serial.print ("Resolution: "); Serial.print(sensor.resolution); Serial.println(" *C");
Serial.println("------------------------------------");
// Print humidity sensor details.
dht.humidity().getSensor(&sensor);
Serial.println("------------------------------------");
Serial.println("Humidity");
Serial.print ("Sensor: "); Serial.println(sensor.name);
Serial.print ("Driver Ver: "); Serial.println(sensor.version);
Serial.print ("Unique ID: "); Serial.println(sensor.sensor_id);
Serial.print ("Max Value: "); Serial.print(sensor.max_value); Serial.println("%");
Serial.print ("Min Value: "); Serial.print(sensor.min_value); Serial.println("%");
Serial.print ("Resolution: "); Serial.print(sensor.resolution); Serial.println("%");
Serial.println("------------------------------------");
// Set delay between sensor readings based on sensor details.
delayMS = sensor.min_delay / 1000;
}
void loop() {
// Read data from DHT
// Delay between measurements.
delay(delayMS);
// Get temperature event and print its value.
sensors_event_t event;
dht.temperature().getEvent(&event);
if (isnan(event.temperature)) {
Serial.println("Error reading temperature!");
}
else {
// Update temperature and humidity
myTemperature = (float)event.temperature;
Serial.print("Temperature: ");
Serial.print(myTemperature);
Serial.println(" C");
}
// Get humidity event and print its value.
dht.humidity().getEvent(&event);
if (isnan(event.relative_humidity)) {
Serial.println("Error reading humidity!");
}
else {
myHumidity = (float)event.relative_humidity;
Serial.print("Humidity: ");
Serial.print(myHumidity);
Serial.println("%");
}
// Use WiFiClientSecure class to create TLS connection
Serial.print("********** connecting to HOST : ");
Serial.println(https_host);
if (!client.connect(https_host, https_port)) {
Serial.println("-> connection failed");
return;
}
/* ignore certificate verification
if (client.verify(https_fingerprint, https_host)) {
Serial.println("-> certificate matches");
} else {
Serial.println("-> certificate doesn't match");
}
*/
// Create a URL for the request
String url = "/write/";
url += apiKeyIn;
url += "?module1=";
url += myTemperature;
url += "&module2=";
url += myHumidity;
Serial.print("********** requesting URL: ");
Serial.println(url);
client.print(String("GET ") + url + " HTTP/1.1\r\n" +
"Host: " + https_host + "\r\n" +
"Connection: close\r\n\r\n");
Serial.println("> Request sent to ASKSENSORS");
while (client.connected()) {
String line = client.readStringUntil('\n');
if (line == "\r") {
String line = client.readStringUntil('\n');
Serial.println("********** ASKSENSORS replay:");
Serial.println(line);
Serial.println("********** closing connection");
break;
}
}
delay(25000); // delay in msec
}